Worship Schedule

Sunday 8:15 a.m. Holy Eucharist Rite I
nave & online: Zoom
Sunday 10:45 a.m. Holy Eucharist Rite II
nave & online: Facebook/website
Tuesday 8:00 p.m. Compline
online: Zoom
Wednesday 12:00 p.m. Eucharist
chapel

Sunday mornings at Grace

Find Us

The Grace Church nave is located at the corner of Washington Street and Boulevard in Gainesville, Georgia.

The parish office, open Monday through Thursday from 10:00 AM – 4:00 PM, is located at 422 Brenau Avenue. Come to the red door that faces Brenau Avenue and ring the bell for access.

Mailing Address: 422 Brenau Avenue, Gainesville, GA 30501
Phone: 770-536-0126

Driving Directions & Parking

Email Clergy & Staff

Member Directory

Welcome to Access ACS

Our parish member directory is now online! Access ACS is available to Grace Episcopal Church members through a secure log in with a username and password. After creating your account, you’ll be able to see directory information for other members, as well as make changes to your own profile information, including adding family and individual photos. When well utilized, this online resource will allow our church members to better connect and engage with one another!

To access the directory for the first time, you’ll need to create a login and password. (Scroll down for instructions.) After that you can click the “Member Directory” link located below and log in with your user name and password.

Member Directory

Create Your Login

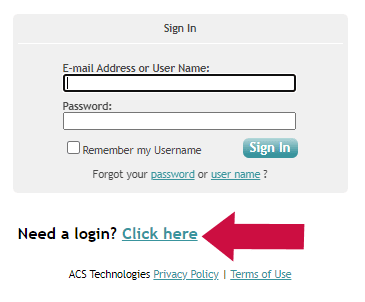
To sign in the first time, click the member directory button above, then click the link next to “Need a login?” on the Sign In screen (as pictured below).

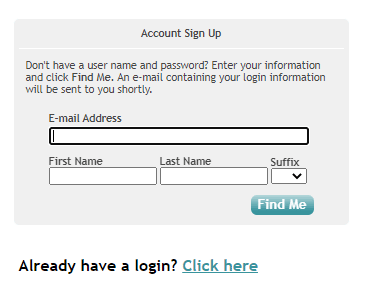
On the Account Sign Up screen (pictured below), enter your email address, first name, last name, and click the “Find Me” button. This information must exactly match what is already listed in the Grace Church member database. If it does, you will receive an email with a link to create your password and complete your registration. Please note that the link in the account verification email is only good for 24 hours so be sure to set up your account before it expires.

If the information does not match and you cannot register, please contact Reba Page at 770-536-0126 or rpage@gracechurchgainesville.org for assistance.

Once you create a login and sign into Access ACS, you can:

  • Click the My Complete Profile to see the contact information that the church has for you.
  • Click the My Giving History to review your financial gifts to the church.
  • Click the My Pledge History to review your pledges to the church.
  • View and/or print the parish member directory.

Scroll down to the “How To” section on this page to see some basic tutorials.

Member Directory & Mobile App

You can search for a specific member using the “Search” feature on the Home Page. Go to the Directories menu at the top of the Access ACS page to view a complete membership directory.

The Member Directory and many of the features of Access ACS are also available through the Church Life mobile app. On your smartphone, go to the Apple Store or Google Play and search for “ACS Church Life”.

You use the same user name and password for the Church Life App that you created for Access ACS.

How To

The Home > My Profile tab displays phone numbers, e-mail addresses, and mailing addresses. With appropriate rights, you can add, edit, or delete this information. Once you make changes, a change request is created. Before your changes display, an administrator must approve the change request.

Preferred Contact Method
On this page you can set up your preferred contact type. By default, Phone Number is selected as the preferred method. If you do not want to be contacted by phone, you have the option to switch your preferred contact method to E-mail or by Text Message.

1. Point to Home, then click My Profile.
2. On the Contact Info tab, click Change Preference.
3. Select how you want to be contacted, then click Submit.

Phone Numbers
The word Preferred displays beside the phone number you designated in your organization’s selected emphasis color. For example, the default emphasis color is red, so beside the preferred phone number displays (Preferred). It is highly recommended you have one phone number designated as Preferred for emergencies or situations where it is imperative to contact you.

1. In the Phone Numbers section, click Add.
2. Select a Phone Type.
3. Enter the Area Code and Number.
4. To display the phone number in the online directory, select Listed.
5. If the phone can receive text messages and you want to receive them at this number, select Receive Text Messages.
6. To mark the phone number as preferred, select Preferred.
7. Click Submit.

E-mail Addresses
If you select to have a preferred e-mail address, the word Preferred displays beside the selected e-mail address in your organization’s selected emphasis color. For example, the default emphasis color is red, so beside the preferred e-mail address displays (Preferred). The number of e-mail address available to you depends on how many e-mail address types you have set up.

1. In the E-mail Addresses section, click Add.
2. Select the E-mail Type and enter the e-mail address.
3. If you want the e-mail to display in the program and directories, select I want this e-mail listed.
4. To mark the e-mail address as preferred, select the This is my preferred e-mail address option.
5. To use the specific e-mail for login purposes, select I want to log in using this e-mail.
6. Click Submit.

If you have appropriate rights, you can add photos to individual and family profiles. All photos must be in .JPG format and the maximum image size you can upload is 10 MB.

Once you add the photo, the administrator receives a change request. Before the photo displays, the administrator must approve the change request. You cannot delete approved photos.

Individual Photo
1. Point to Home, then click My Profile.
2. At the top of the page, click Edit.
3. At the top of the Change Request page, click Personal Photo.
4. Click Choose file.
5. In the File Upload window, select the photo that you want to upload and click Open.
6. Click Save.

Family Photo
1. Point to Home, then click My Profile.
2. At the top of the page, click Edit.
3. On the Change Request page, click Family Info.
4. At the top of the Family Change Request page, click Family Photo.
5. Click Choose file.
6. In the File Upload window, select the photo that you want to upload and click Open.
7. Click Save.

Members can print both individual and family directories in Access ACS. Under the Directories tab, select one of these options:

View an Individual Directory
View a Family Directory
View an Individual Directory with photos
View a Family Directory with photos

Please note that members can choose what information is shared in the secure online directory.

If you do NOT want you or your family’s information included in the secure online directory available to other church members when they are logged in to Access ACS, you have the choice to OPT OUT. Your contact information and photos will still be retained within our internal database, for access by church staff only.

On the Personal Preferences page, you can customize your privacy and viewing preferences. You can include your family and individual information in online directories and choose to display photos when you view online directories.

To select your personal preferences

1. Point to Home, then click My Account.
2. Click the Personal Preferences tab.
3. On the Personal Preferences tab, select the options that you want.
4. Click Save.

Please note that your giving and pledge history is NOT available to other members.

The My Giving History tab displays your contribution history for a selected year. To view your contributions:

1. Point to Home > My Profile, then click My Giving History.
2. Locate the Contribution Information section.
3. To view your ten most recent contributions, click 10 Most Recent Contributions.
4. To view all of your contributions, click Show All.
5. To view only contributions made in a specific date range, click During Date Range. Enter the Start Date and End Date, then click Go.

To view pledge history

1. Point to Home > My Profile, then click My Pledge History.
2. The total of your pledges given in the selected year displays after Total Given to Pledges in . If any money is required to meet your established pledge goal, the amount displays under Balance.
3. Your progress toward meeting your pledge displays as well. If a pledge is forgiven, the word Forgiven displays instead of the progress bar, and the balance is $0.00.
4. To change the year you are viewing pledges for, click the Pledge Summary for drop-down list.

If you need to change a pledge, you can do that from the “Click here to request a change to an existing pledge.” link in this window. This generates an e-mail to the pledge administrator.

Connect with Us

Join Our Email List